PHYLOPOP.com - Tabbed content box or tab view is a great way to maximize the usage of precious screen real estate on your blog.
There are quite a few tutorials out there that show how to create tabs with CSS and jQuery. However, most of them require you to modify your blog template codes. On top of that you also have to manually add the content of each tab.
Fortunately, with this tutorial you don’t have to go to all that troubles. All you have to do is add our tabber code into a HTML/Javascript widget. Once added, it will transform your Blogger blog’s existing widgets into tabs, automatically!
See the demo here.
Below are some of the features of the tab content box:
- Accommodates unlimited number of widgets.
- Keeps the tabbed widgets’ original appearance.
- Fully widgetized for ease of installation and removal. If you don’t like what it does, simply remove the HTML/Javascript gadget.
Installation
- Go to Design > Page Elements and click Add A Gadget.
- Select HTML/Javascript widget.
- Leave the title box blank.
- Copy the code below and paste it inside the content box.
01<styletype="text/css">02.tabber {03padding: 0px !important;04border: 0 solid #bbb;05}06.tabber h2 {07float: left;08margin: 0 1px 0 0;09font-size: 12px;10padding: 3px 5px;11border: 1px solid #bbb;12margin-bottom: -1px; /*--Pull tab down 1px--*/13overflow: hidden;14position: relative;15background: #e0e0e0;16cursor:pointer;17-moz-border-radius:5px 5px 0 0;18border-radius:5px 5px 0 0;19}20html .tabber h2.active {21background: #fff;22border-bottom: 1px solid #fff; /*--"Connect" active tab to its content--*/23}24.tabber .widget-content {25border: 1px solid #bbb;26padding: 10px;27background: #fff;28clear:both;29margin:0;30}31.codewidget, #codeholder {32display:none;33}34</style>3536<scripttype="text/javascript"src="http://ajax.googleapis.com/ajax/libs/jquery/1.6.0/jquery.min.js"></script>37<scripttype="text/javascript"src="http://greenlava-code.googlecode.com/svn/trunk/publicscripts/bloggertabs0.1_min.js"></script>38<scripttype="text/javascript">39$(document).ready(function() {40$('#codeholder').bloggerTabber ({41tabCount : 342});43});44</script>4546<!-- to make sure the widget works, do not alter the code below -->47<divid='codeholder'><p>Get this <ahref="http://www.bloggersentral.com/2011/05/create-tabbed-content-blogger-widgets.html"target="_blank">widget</a></p></div>- Code line 36 is for loading jQuery library. Remove this line if you’ve already loaded it somewhere else in your blog. Hint: If your blog has a slider, cycler or something with fading effect running, chances are it is powered by jQuery.
- Specify the number of widgets that you want to turn into tabs in line 41.
- The default box background color is white (#fff). You can change it in code line 27. Apply the same color for the active tab’s background and bottom border (in line 21 and 22).
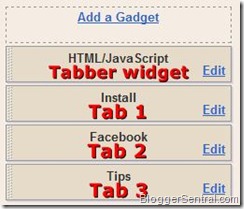
- Position the HTML/Javascript gadget above the gadgets that you want to tabify.

- Click Save and view your blog.
Post-installation
- Make sure you title each widget that you want to tabify. Tabber won’t work properly without widget titles.
- Reduce tab widths so that all tabs fit into a single row. This can be achieved by using short widget titles.
- You may need to reduce the widths of the tabified widgets to fit them into the box.
- Don’t forget to test in Internet Explorer. This widget may cause “Operation aborted” error in IE for some non-designer templates. If that’s the case, this widget is not for you :(
Enjoy!

Posting Komentar